Expanding Your Storage
Need more space for your ever-growing game library? Your Playnix console supports storage expansion through an additional NVMe SSD.
Overview
The Playnix console features a built-in NVMe port that allows you to add a second solid-state drive, effectively doubling (or more) your available storage space for games and applications.
Benefits of Expansion
- 📦 More Games - Install your entire Steam library
- ⚡ Fast Performance - NVMe SSDs offer excellent speed
- 🔧 Easy Installation - Simple upgrade process
- 💰 Cost-Effective - Choose the capacity that fits your budget
What You'll Need
Before you begin, gather these items:
- Compatible NVMe M.2 SSD (See compatibility section below)
- Phillips head (#1 or #2) screwdriver
- Your Playnix console
- Well-lit workspace
- 5 minutes of time
Compatible SSDs
Recommended Specifications
Your NVMe SSD should meet these requirements:
| Specification | Requirement |
|---|---|
| Form Factor | M.2 2280 (22mm x 80mm) |
| Interface | NVMe PCIe Gen 3 or Gen 4 |
| Capacity | 256GB minimum, 2TB recommended |
| Type | Single-sided or double-sided |
Recommended Brands
These brands are tested and work well with Playnix:
- Samsung (980, 980 Pro, 990 Pro)
- Western Digital (WD Black SN750, SN850)
- Crucial (P3, P5 Plus)
- Kingston (KC3000, NV2)
- Sabrent (Rocket)
Capacity Recommendations
- 512GB - Good for 10-15 large games
- 1TB - Recommended for most users (20-30 games)
- 2TB - Ideal for extensive libraries (40-60+ games)
Installation Process
Safety First
Before proceeding:
- Power off your console completely
- Unplug the power cable
- Wait 5 minutes for the console to cool down
- Ground yourself to prevent static electricity damage
Step-by-Step Installation
1. Locate the Storage Compartment
On the bottom of your Playnix console, you'll find a small removable cover panel.
2. Remove the Cover Panel
- Using your nail, remove the cover
- Gently lift the cover panel off
- Set aside the cover in a safe place
3. Prepare the SSD Slot
You'll see the NVMe M.2 slot inside the compartment:
- A mounting screw post is at the far end
- The connector is at the near end

4. Insert the SSD
- Hold the SSD at a 30-degree angle
- Align the notch on the SSD with the slot
- Gently insert the SSD into the connector
- Press down firmly but carefully until it clicks into place
- The SSD should sit flat against the mounting post
Handle With Care
SSDs contain sensitive electronics. Hold them by the edges and avoid touching the gold connector pins.
5. Secure the SSD
- Using your Phillips screwdriver, insert and tighten the mounting screw
- The screw should be snug but not over-tightened
- The SSD should be firmly held in place without movement

6. Replace the Cover Panel
- Position the cover panel over the compartment
- Ensure the cover is flush with the console body
7. Power On Your Console
- Reconnect the power cable
- Press the power button to turn on your console
- The system will boot normally
Automatic Formatting
What Happens Next
The first time you boot your console after installing a new SSD:
- Detection - The system automatically detects the new drive
- Formatting - PlaynixOS formats the drive for gaming use
- Configuration - The drive is configured for optimal performance
- Integration - The drive appears in your storage settings
Automatic Data Deletion
CRITICAL WARNING: The formatting process is automatic and irreversible.
- All existing data on the SSD will be permanently deleted
- This process cannot be stopped once started
- There is no recovery of previous data
- Ensure your SSD is blank or you've backed up any data before installation
Formatting Duration
The formatting process typically takes:
- 256GB SSD: 1-2 minutes
- 512GB SSD: 2-3 minutes
- 1TB SSD: 3-5 minutes
- 2TB SSD: 5-8 minutes
During this time:
- The console will be unresponsive to inputs
- Do not turn off the console
Using Your New Storage
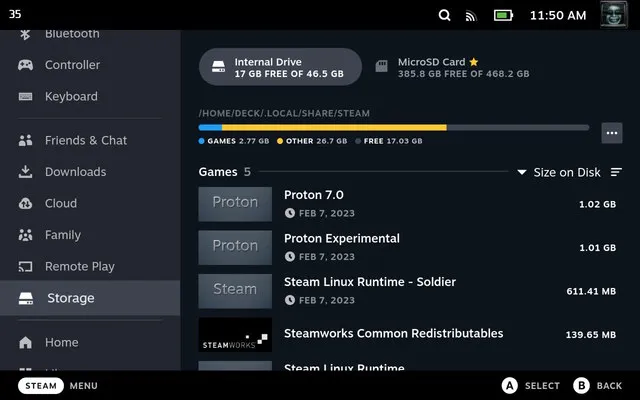
Viewing Available Storage
To check your storage:
- Press the central button on your controller
- Navigate to Settings
- Select Storage
- View both internal and expansion drive capacities
Managing Storage
You can move games between drives:
- Right-click any installed game
- Select "Properties" → "Local Files"
- Click "Move Install Folder"
- Choose destination drive
- Confirm the move
Troubleshooting
SSD Not Detected
If your expansion SSD isn't recognized:
- Power off and check physical connections
- Ensure SSD is fully seated in the slot
- Verify mounting screw is properly tightened
- Try restarting the console
- Check SSD compatibility
Removing an Expansion SSD
If you need to remove your expansion SSD:
- Power off the console completely
- Unplug the power cable
- Open the storage compartment
- Unscrew the mounting screw
- Gently lift the SSD at a 30-degree angle
- Pull straight out from the connector
- Replace the cover panel
Data Loss Prevention
Always remove/uninstall all games from the expansion drive through Steam before physically removing the drive to prevent data loss or corruption.
Warranty Considerations
- Installing expansion storage does not void your warranty
- Use only compatible SSDs to maintain warranty coverage
- Physical damage from improper installation is not covered
- Keep the storage compartment cover secure during operation
Remember: Storage expansion is reversible, non-destructive to your console, and a great way to grow your gaming library. Take your time during installation and enjoy your increased capacity!
For more hardware questions, visit our FAQ or Troubleshooting Guide.